Thursday, September 6, 2012

Notification in Android Using AlarmManager, BoradCastReceiver & Services


    Our aim is to show notification message to user in a specific time.

    Say For example , I have planned to show Notification Message to user at 2 pm on 25 September 2012, even though the user did not visited my app.

   You can download the complete code from My Github
    https://github.com/sankarganesh/NotificationDemo

          Step 1:

                      Create a Calendar Object and set the date and time in which we want to show the Notification message to the user. As per our example , we have to set 2012-Sep-06 14:25:00
                        
                        The Calendar takes the Value for month of January as 0 , the value of Sep should be 8 not 9.

                         Calendar Calendar_Object  = Calendar.getInstance();
                         Calendar_Object.set(Calendar.MONTH, 8);
                         Calendar_Object.set(Calendar.YEAR, 2012);
                         Calendar_Object.set(Calendar.DAY_OF_MONTH, 6);

                         Calendar_Object.set(Calendar.HOUR_OF_DAY, 14);
                         Calendar_Object.set(Calendar.MINUTE, 25);
                         Calendar_Object.set(Calendar.SECOND, 0);


           Step 2:

                We need to create an alarm which help us to invoke the BroadCastReceiver on our specified time.

                           // MyView is my current Activity, and AlarmReceiver is the BoradCastReceiver
                             Intent myIntent = new Intent(MyView.this, AlarmReceiver.class);

                            PendingIntent pendingIntent = PendingIntent.getBroadcast(
                            MyView.this, 0, myIntent, 0);

                           AlarmManager alarmManager = (AlarmManager)                              getSystemService(ALARM_SERVICE);

                        /* 
                           The following sets the Alarm in the specific time by getting the long value of the alarm  date time which is in calendar object by calling the getTimeInMillis(). Since Alarm supports only long value , we're using this method.
                       */

                    alarmManager.set(AlarmManager.RTC, Calendar_Object.getTimeInMillis(),
                            pendingIntent);

             Step 3:
                         
               We need to create a BroadCastReceiver which invoked when our alarm is triggered.

                            import android.content.BroadcastReceiver;
                            import android.content.Context;
                            import android.content.Intent;

                            public class AlarmReceiver extends BroadcastReceiver {

                                 @Override
                                 public void onReceive(Context context, Intent intent) {
                                 // When our Alaram time is triggered , this method will be excuted (onReceive)
                                 // We're invoking a service in this method which shows Notification to the User
                                  Intent myIntent = new Intent(context, NotificationService.class);
                                  context.startService(myIntent);
                                }

                          } 

             Step 4:

               We need to Create a Service which will show Notification to the User.

                           import android.app.Notification;
                           import android.app.NotificationManager;
                           import android.app.PendingIntent;
                           import android.app.Service;
                           import android.content.Intent;
                           import android.os.IBinder;

                           public class NotificationService extends Service {

                               private NotificationManager mManager;

                               @Override
                                public IBinder onBind(Intent arg0) {
                                 // TODO Auto-generated method stub
                                 return null;
                               }

                               @Override
                               public void onCreate() {
                               super.onCreate();
                               }

                               @Override
                               public void onStart(Intent intent, int startId) {
                               super.onStart(intent, startId);
                              // Getting Notification Service
                              mManager = (NotificationManager) this.getApplicationContext()
                             .getSystemService(                                                         this.getApplicationContext().NOTIFICATION_SERVICE);
                              /* 
                              When the user taps the notification we have to show the Home Screen of our App,      this job can be done with the help of the following Intent.
                              */
                                Intent intent1 = new Intent(this.getApplicationContext(),
                                MyView.class);

                               Notification notification = new Notification(R.drawable.icon,
                              "See My App something for you", System.currentTimeMillis());

                               intent1.addFlags(Intent.FLAG_ACTIVITY_SINGLE_TOP
                                | Intent.FLAG_ACTIVITY_CLEAR_TOP);

                               PendingIntent pendingNotificationIntent = PendingIntent.getActivity(
                               this.getApplicationContext(), 0, intent1,
                               PendingIntent.FLAG_UPDATE_CURRENT);

                               notification.flags |= Notification.FLAG_AUTO_CANCEL;

                              notification.setLatestEventInfo(this.getApplicationContext(), "SANBOOK",
                              "See My App something for you", pendingNotificationIntent);

                              mManager.notify(0, notification);
    }

    @Override
    public void onDestroy() {
        // TODO Auto-generated method stub
        Logger.error("Alam Services Destroyed");
        super.onDestroy();
    }

}

 Step 5:
        Don't forget to register your Broadcast Receiver as well as Services and your Activity in Manifest File.
       Also Don't forget to add the permission <uses-permission android:name="android.permission.WAKE_LOCK" />

Step 6:

              Here's the output in Tablet Devices and Mobile 

             Tablet Device:


       Mobile Devices:


Friday, May 18, 2012

Checking whether your app running in a Phone or in a Tablet


How to check whether your app running in a Phone or in  a Tablet ?


Step1:  Create a Display Object which help us to retrieve the width and height of the device.

Step2 :  Method which i had wrote below will return true if your app running in Tablet or it will return false.
 
public static boolean isTablet(Display display) {

        Log.d("tablet", "isTablet()  invoked");
      
        final int width = display.getWidth();
        final int height = display.getHeight();     
  

        switch (display.getOrientation()) {

        case 0: case 2:   // Landscape Mode
            if(width > height) return true;
            break;
        case 1: case 3:  // Portrait Mode
            if(width < height) return true;
            break;
        }
        return false;
    }

Monday, January 30, 2012

Using Custom Font in android

How to use Custom Font whose file size is higher than asset folder in android?

Step 1: Just place that font file on raw folder "/res/raw/chen.ttf" , Say here the font name is chen.ttf

Step 2: 

Typeface  typeFace= readFont(R.raw.chen); 
textView.setTypeface(typeFace);

Step 3:

Create a method which reads the font file and set it to typeface object
 
Step 4:  

Typeface readFont(int resource)
{  
Typeface tf_obj = null;
InputStream is = getResources().openRawResource(resource);
String path = Environment.getExternalStorageDirectory().getAbsolutePath() + "/gmg_underground_tmp";
File f = new File(path);
if (!f.exists())
{
    if (!f.mkdirs())
        return null;
}
String outPath = path + "/tmp.raw";
try
{
    byte[] buffer = new byte[is.available()];
    BufferedOutputStream bos = new BufferedOutputStream(new FileOutputStream(outPath));

    int l = 0;
    while((l = is.read(buffer)) > 0)
    {
        bos.write(buffer, 0, l);
    }
    bos.close();

    tf_obj = Typeface.createFromFile(outPath);

    File f2 = new File(outPath);
    f2.delete();
}
catch (IOException e)
{
    return null;
}
return tf_obj;      }

Monday, September 19, 2011

Creating Rounded Corners of Image in Android?


Step 1: I had created a class Image Helper

//  Import the following packages

import android.graphics.Bitmap;
import android.graphics.Canvas;
import android.graphics.Paint;
import android.graphics.PorterDuffXfermode;
import android.graphics.Rect;
import android.graphics.RectF;
import android.graphics.Bitmap.Config;
import android.graphics.PorterDuff.Mode;

public class ImageHelper {


public static Bitmap getRoundedCornerBitmap(Bitmap bitmap, int pixels) {

Bitmap output = Bitmap.createBitmap(bitmap.getWidth(), bitmap
.getHeight(), Config.ARGB_8888);
Canvas canvas = new Canvas(output);

final int color = 0xff424242;
final Paint paint = new Paint();
final Rect rect = new Rect(0, 0, bitmap.getWidth(), bitmap.getHeight());
final RectF rectF = new RectF(rect);
final float roundPx = pixels;

paint.setAntiAlias(true);
canvas.drawARGB(0, 0, 0, 0);
paint.setColor(color);
canvas.drawRoundRect(rectF, roundPx, roundPx, paint);

paint.setXfermode(new PorterDuffXfermode(Mode.SRC_IN));
canvas.drawBitmap(bitmap, rect, rect, paint);

return output;
}
}
           
Step 2: Call the above function as i shown below

Imageview icon;

icon =(ImageView) findViewById(R.id.myimageview);
String img_value="http://www.google.com/";

Bitmap mIcon11 = BitmapFactory.decodeStream(img_value
.openConnection().getInputStream());
mIcon11=ImageHelper.getRoundedCornerBitmap(mIcon11,30);

icon.setImageBitmap(mIcon11);

Monday, August 22, 2011

Generating FingerPrint using Keytool in Android

Hi All,
     
       Follow the Steps to generate the finger print using Keytool in Android in Eclipse IDE

Step 1:
          Right Click your Project and Chosse  Export as Shown in the following picture


Step 2:
           Then a Dialog Box is Open , in that Click Android , then Choose Export Android Application as Shown Below


Step 3:         
               Then Click Next, and Next for futher Processing, then you can see a option of Creating or Using the Existing KeyStore , If you are creating KeyStore, for the first time, then you can choose Create new KeyStore Option as shown below


Step 4:

               Then Locate yur KeyFile Location as Shown Below


Step 5:
                  Give password and give confrim password too and click Next for futher processing as i shown here

Step 6:
                The Next Windows ask you to provide details Alias, Password, confirm password and validity ad shown below here, Enter those details


Step 7:

      Browse your destination .apk file in the next windows, as i did below


Step 8: Hit Finish

Step 9: Now open Command Prompt and set the current path java]jdk1.6\bin
 Then use the following command

C:\Program Files\Java\jdk1.6.0_23\bin>keytool -list -alias santest -keystore "C:
\Documents and Settings\Farshore\Desktop\mykeystore\mykeyval"
Enter keystore password:
santest, Feb 16, 2011, PrivateKeyEntry,
Certificate fingerprint (MD5): 7A:8C:AC:CF:64:D7:83:4E:85:43:BF:5E:D7:65:10:B6

C:\Program Files\Java\jdk1.6.0_23\bin>


Now we can use that fingerprint in your xml file.


Friday, July 8, 2011

Setting Background Image and xml Resource

Use Layer List and Item tag for setting Image and use solid tag and set the color as #AA000000 for transparent as shown below 

   <?xml version="1.0" encoding="utf-8"?>
    <layer-list xmlns:android="http://schemas.android.com/apk/res/android">
  <item>
    <shape xmlns:android="http://schemas.android.com/apk/res/android"
        android:shape="rectangle" android:padding="10dp">
        <solid android:color="#AA000000"/>
        <corners android:bottomRightRadius="30dp"
            android:bottomLeftRadius="30dp" android:topLeftRadius="30dp"
            android:topRightRadius="30dp" />
    </shape>
    </item>
  <item> <bitmap android:src="@drawable/yourfilename"/>
</item>
 </layer-list>

Thursday, June 23, 2011

Change Android TextView Color when user pressed or Clicked TextView


Step 1: Create an XML under  res/color/text_color.xml as shown below

<?xml version="1.0" encoding="utf-8"?>
<selector xmlns:android="http://schemas.android.com/apk/res/android">
    <item android:state_pressed="true"
          android:color="#ffff0000"/> <!-- pressed -->
    <item android:state_focused="true"
          android:color="#ff0000ff"/> <!-- focused -->
    <item android:color="#ff000000"/> <!-- default -->
</selector>

Step2:  Apply it to TextView as i shown below

<TextView
    android:layout_width="fill_parent"
    android:layout_height="wrap_content"
    android:text="@string/button_text"
    android:textColor="@color/text_color" />


That's it

Tuesday, June 7, 2011

Changing the color of android list item on click or selection events?

Step1: Embbed the android:listSelector attribute in your ListView as Shown Below.


<ListView android:id="@+id/android:list" 
         android:layout_width="fill_parent"
        android:layout_height="wrap_content" 
        android:layout_below="@+id/Tablayoutdesign"
        android:cacheColorHint="#000000"
        android:dividerHeight="1dip"
        android:layout_marginTop="63dip"
        android:layout_marginBottom="40dip"

        />
 
Step2: Create a new xml named listselector and put the following code in that

<?xml version="1.0" encoding="utf-8"?>
<selector xmlns:android="http://schemas.android.com/apk/res/android"> 

  <!-- Selected --> 
  <item 
    android:state_focused="true" 
    android:state_selected="false" 
    android:drawable="@drawable/focused"/> 

  <!-- Pressed -->
  <item 
    android:state_selected="true" 
    android:state_focused="false"
    android:drawable="@drawable/selected" /> 
</selector> 

Step3: Create a file named colors.xml add the following the code in that file

<resources>
    <drawable name="focused">#ff5500</drawable>
    <drawable name="selected">#FF00FF</drawable>
</resources>
 
Add this line in your java code

ListView lv= (ListView) findViewById(R.id.list);
lv.setSelector( R.drawable.listselector);

Friday, May 20, 2011

Using JSON in Android


              JSON (JavaScript Object Notation):

                        JSON is a light weight one, which help us to interchange data in a simple manner.

            JSON is built on two structures:


1.     A collection of name/value pairs. In various languages, this is realized as an object, record, struct, dictionary, hash table, keyed list, or associative array.

For Instance in Java we refer it is an Object.

2.     An ordered list of values. In most languages, this is realized as an array, vector, list, or sequence.

For Instance in Java we refer it as array.


Rules for creating a JSON string:

A JSON string contains either an array of values, or an object (an associative array of name/value pairs).

An array is surrounded by square brackets, [ and ], and contains a comma-separated list of values.

An object is surrounded by curly brackets, { and }, and contains a comma-separated list of name/value pairs.

A name/value pair consists of a field name (in double quotes), followed by a colon (:), followed by the field value.

A value in an array or object can be:

A number (integer or floating point)

A string (in double quotes)

A boolean (true or false)

Another array (surrounded by square brackets, [ and ])

Another object (surrounded by curly brackets, { and })

The value null

  
Example of a JSON:


Starting point of JSON object so we used curly brackets


{" data ":
{ 
     "Book Title": “C world",
     “Book Author ": “Dennis Retchie”,
     "address":
“_comment”: “another JSON Object...",
    {
         "streetAddress": "21 2nd Street",
         "city": "New York",
         "state": "NY",
         "postalCode": "10021"
     },
     "phoneNumber":
“_comment”: “Starting of JSON Array...",
     [
         {
           "type": "home",
           "number": "212 555-1234"
         },
         {
           "type": "fax",
           "number": "646 555-4567"
         }
     ]
 } }

Let us fetch the Value from JSON in Android

Step 1: Create JSONObject as shown I below

private JSONObject myJSONObject=new JSONObject(),myJSONfetchdata;

            Step 2: Initialize it as I Shown Below

                        myJSONfetchdata = myJSONObject.getJSONObject(“data”);

            Step 3: Fetch the Values as I Shown Below

                        String mybooktitle   =  myJSONfetchdata.getString("Book Title");

                        String mybookauthor= myJSONfetchdata.getString("Book Author ");

                        JSONObject address =myJSONfetchdata. getJSONObject ("address");

                        String streetAddress  =address.getString("streetAddress");

                        String city  = address.getString("city");

                        String state = address.getString("state");

                        String postalCode  = address.getString("postalCode");

                        JSONArray phoneNumber =  myJSONfetchdata.getJSONArray(“phoneNumber”);

                        String[] type  =  new String[phoneNumber.length()];

                         String[]  number  = new String[phoneNumber.length()];

                        for(int z=0;z< phoneNumber.length();z++)
                         {
                                    type [z]   =  phoneNumber.getString("type ");
                                    number [z] = phoneNumber.getString("number");
                          }


Tuesday, May 10, 2011

How to Fetch Phone contacts and Show it in AutoComplete TextView in Android ?

  Step 1. Create Autocomplete in a xml file as i shown below

<AutoCompleteTextView android:paddingTop="15dp"
android:id="@+id/txtPhoneNo"
android:focusableInTouchMode="true"
android:layout_width="fill_parent"
android:layout_height="wrap_content"
android:imeOptions="actionDone"/>

Step 2. Add the following permission in your Android Mainfeast file for accessing contacts

<uses-permission android:name="android.permission.READ_CONTACTS" />

Step 3. Create an Activity and maps the autocompletetextview component in your Java Code

public class MyContacts extends Activity {

AutoCompleteTextView txtPhoneNo;


public ArrayList<String> c_Name = new ArrayList<String>();
public ArrayList<String> c_Number = new ArrayList<String>();
String[] name_Val=null;
String[] phone_Val=null;

@Override
public void onCreate(Bundle icicle)
{
super.onCreate(icicle);
txtPhoneNo = (AutoCompleteTextView) findViewById(R.id.txtPhoneNo);

}

Step 4: Use ContentReslover to fetch the contacts, if you are running it in Android 1.6 or before version use people class for fetching contacts and add that contacts in an Array List as i shown below

ContentResolver cr1 = getContentResolver();

String[] projection = new String[] { People._ID,People.NAME,People.NUMBER };

Uri phone_contacts = People.CONTENT_URI;

Cursor managedCursor = cr1.query(phone_contacts, projection, null, null, People.NAME + " ASC");

if (managedCursor.moveToFirst()) {

String contactname;
String cphoneNumber;
int nameColumn = managedCursor.getColumnIndex(People.NAME);
int phoneColumn = managedCursor.getColumnIndex(People.NUMBER);
Log.d("int Name",Integer.toString(nameColumn));
Log.d("int Number",Integer.toString(phoneColumn));


do {
// Get the field values
contactname = managedCursor.getString(nameColumn);
cphoneNumber = managedCursor.getString(phoneColumn);
if((contactname != " " || contactname != null) && (cphoneNumber!= " " ||cphoneNumber!= null))
{

c_Name.add(contactname);
c_Number.add(cphoneNumber);
}


} while (managedCursor.moveToNext());

}


// Donot use People class if your using android1.6 above

Uri contacts = Uri.parse("content://icc/adn");

Cursor managedCursor1 =cr.query(contacts, null, null, null, null);

if (managedCursor1.moveToFirst()) {

String contactname;
String cphoneNumber;

int nameColumn = managedCursor1.getColumnIndex("name");
int phoneColumn = managedCursor1.getColumnIndex("number");

Log.d("int Name",Integer.toString(nameColumn));
Log.d("int Number",Integer.toString(phoneColumn));


do {
// Get the field values
contactname = managedCursor1.getString(nameColumn);
cphoneNumber = managedCursor1.getString(phoneColumn);
if((contactname != " " || contactname != null) && (cphoneNumber!= " " ||cphoneNumber!= null))
{

c_Name.add(contactname);
c_Number.add(cphoneNumber);
}

} while (managedCursor1.moveToNext());

}


Step 5: Now convert the ArrayList to Array and set that Array to AutoComplete as i Shown Below

name_Val = (String[]) c_Name.toArray(new String[c_Name.size()]);
phone_Val= (String[]) c_Number.toArray(new String[c_Name.size()]); ArrayAdapter<String> adapter = new ArrayAdapter<String>(this,android.R.layout.simple_dropdown_item_1line, name_Val);
txtPhoneNo.setAdapter(adapter);

Friday, April 22, 2011

Publishing FaceBook Checkin a place in Android


Step 1: In-order to publish a place via checkin we are in need of the following parameters

1. Access Token
2. Place which is to be Checkin
3. Message which will display to your friends
4. Latitude and Longitude of that place
5. Tag i.e. User Id

Step 2: Use Bundle to wrap the above parameters

Bundle params = new Bundle();
params.putString("access_token", Main.access);
params.putString("place", "203682879660695");
params.putString("Message","I m here in this place");
JSONObject coordinates = new JSONObject();
coordinates.put("latitude", Main.mylat);
coordinates.put("longitude", Main.mylong);
params.putString("coordinates",coordinates.toString());
JSONArray frnd_data=new JSONArray();
params.putString("tags", "xxxx");//where xx indicates the User Id

Step 3:  Call the Request method and check whether proper response you had got

String response = faceBook.request("me/checkins", params, "POST");
Log.d("Response",response);

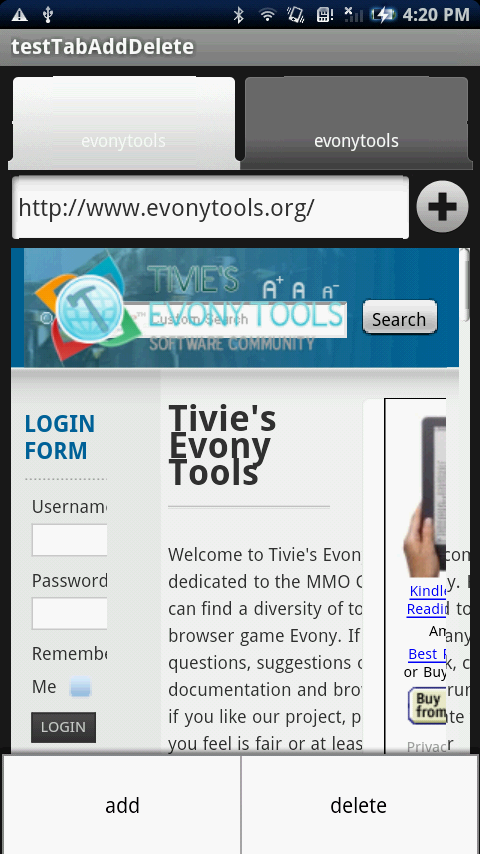
Adding Tabs dynamically in Android


Step 1: Create a xml name tabhost.xml, for desigining the Tab Host, as i shown below
<?xml version="1.0" encoding="utf-8"?>
<TabHost xmlns:android="http://schemas.android.com/apk/res/android"
android:id="@android:id/tabhost"
android:layout_width="fill_parent"
android:layout_height="fill_parent">
<LinearLayout
android:orientation="vertical"
android:layout_width="fill_parent"
android:layout_height="fill_parent"
android:padding="5dp">
<TabWidget
android:id="@android:id/tabs"
android:layout_width="fill_parent"
android:layout_height="wrap_content"
android:tag="tabPane"
/>
<RelativeLayout
android:orientation="vertical"
android:layout_width="fill_parent"
android:layout_height="wrap_content">
<EditText
android:id="@+id/address_bar"
android:layout_width="270px"
android:layout_height="50px"
android:layout_alignParentLeft="true"
android:layout_alignParentTop="true"
/>
<ImageButton
android:id="@+id/add_btn"
android:layout_width="50px"
android:layout_height="50px"
android:src="@android:drawable/ic_menu_add"
android:background="@android:color/transparent"
android:layout_toRightOf="@id/address_bar"
/>

</RelativeLayout>
<FrameLayout
android:id="@android:id/tabcontent"
android:layout_width="fill_parent"
android:layout_height="fill_parent"
android:padding="2dp" />
</LinearLayout>
</TabHost>


Step 2:  Create a Activity which extends TabActitvity as i shown below


public class Main extends TabActivity{

private TabHost tabHost;
private EditText addressBar;
  private final static String DEFAULT_URL = "http://www.google.com/";
private int z = 0;
private String SanTest=null;

/** Called when the activity is first created. */
@Override
public void onCreate(Bundle savedInstanceState) {
super.onCreate(savedInstanceState);
setContentView(R.layout.tabs_main);

this.tabHost = getTabHost(); // The activity TabHost
this.addressBar = (EditText) findViewById(R.id.address_bar);
this.addressBar.setText(DEFAULT_URL);


ImageButton addBtn = (ImageButton) findViewById(R.id.add_btn);

addBtn.setOnClickListener(new OnClickListener() {

@Override
public void onClick(View v) {

  addMethod();  // Method which adds the Tab Host
}
});
Intent openBrowser = new Intent();
openBrowser.setClass(Main.this, Browser1.class);
openBrowser.putExtra("URL", DEFAULT_URL);
SanTest=Intent.CATEGORY_LAUNCHER;
Log.d("SanTest",SanTest);
tabHost.addTab(tabHost.newTabSpec("Main").setIndicator(getHost(DEFAULT_URL)).setContent(openBrowser));


}


private void addMethod() {

String webSiteURL = validateURL(addressBar.getText().toString().trim());
String webSiteName = getHost(webSiteURL);

Intent openBrowser = new Intent();
openBrowser.setClass(this, Browser1.class);
openBrowser.putExtra("URL", webSiteURL);

tabHost.addTab(tabHost.newTabSpec(webSiteName + Integer.toString(z)).setIndicator(webSiteName).setContent(openBrowser));
Log.d("z",Integer.toString(z));
++z;

}

private void deleteMethod() {

// Since we can't really delete a TAB
// We hide it

int position = tabHost.getCurrentTab();
Log.d("Position",Integer.toString(position));


// if (position != 0 ) {
//
// tabHost.getCurrentTabView().setVisibility(1);
// tabHost.setCurrentTab(position-1);
//
// }
// else if(position== z){
// tabHost.getCurrentTabView().setVisibility(1);
// tabHost.setCurrentTab(position+1);
// }
Log.d("Z val in delete()",Integer.toString(z));
if(position >0)
{
tabHost.getCurrentTabView().setVisibility(View.GONE);
tabHost.setCurrentTab(position+1);
z-=1;
if(z<0)
z=0;
}
else if(position == 0)
{
tabHost.getCurrentTabView().setVisibility(View.GONE);
tabHost.setCurrentTab(position+1);
z=0;
}
else if(position == z)
{
tabHost.getCurrentTabView().setVisibility(View.GONE);
tabHost.setCurrentTab(z-1);
Log.d("Z value in final","lol");
Log.d("Pos",Integer.toString(position));
Log.d("z pos",Integer.toString(z));


}


}

// Inflates menu when "menu Key" is pressed
@Override
public boolean onCreateOptionsMenu(Menu menu) {
MenuInflater inflater = getMenuInflater();
inflater.inflate(R.menu.title_icon, menu);
return true;
}

// This method is called once the menu is selected
@Override
public boolean onOptionsItemSelected(MenuItem item) {


switch (item.getItemId()) {

case R.id.add:

addMethod();

break;

case R.id.delete:

deleteMethod();

break;
}
return true;
}

private String validateURL(String url) {

StringBuffer urlB = new StringBuffer();

// checks if addressBar has a valid URL
// you can add stuff here in order to validate
// this is just an example
if (url.startsWith("http://")) {urlB.append(url);} else {urlB.append("http://");}

try {
URL urlTry = new URL(urlB.toString());

return urlB.toString();

} catch (MalformedURLException e) {

return "http://www.google.com/";
}
}

private String getHost(String url) {

try {

URL urlTry = new URL(url);

return urlTry.getHost().replace("www.", "").replace(".com", "").replace(".org", "").replace(".net", "");

} catch (MalformedURLException e) {

return "Browser";
}
}

}
 
Step 3:  Inside an XML , which will display the Web View

<?xml version="1.0" encoding="utf-8"?>
<LinearLayout
android:layout_width="fill_parent"
android:layout_height="fill_parent"
xmlns:android="http://schemas.android.com/apk/res/android"
android:orientation="vertical"
>
<WebView
android:layout_width="fill_parent"
android:layout_height="fill_parent"
android:id="@+id/webview"

/>
</LinearLayout>

Step 4:  Create the Activity which load the url in WebView

public class Browser1 extends Activity {

private WebView webview;

private String URL;


@Override
public void onCreate(Bundle savedInstanceState) {
super.onCreate(savedInstanceState);
setContentView(R.layout.broswer);
webview = (WebView) findViewById(R.id.webview);

Bundle extras = getIntent().getExtras();
Log.d("I m before If","1");
if (extras == null) {
Log.d("I m in if condition","1");
URL = "http://www.google.org/";

} else {
Log.d("I m in else condition","2");
this.URL = extras.getString("URL");
Log.d("URL",this.URL);
}

getWebView();

}

public void getWebView() {
//Log.d("GetWebView Invoked", URL);
webview.loadUrl(URL);
webview.setWebViewClient(new HelloWebViewClient());
webview.getSettings().setJavaScriptEnabled(true);

}

private class HelloWebViewClient extends WebViewClient {

@Override
public boolean shouldOverrideUrlLoading(WebView view, String url) {
view.loadUrl(url);
return true;
}
}

public boolean onKeyDown(int keyCode, KeyEvent event) {
if ((keyCode == KeyEvent.KEYCODE_BACK) && webview.canGoBack()) {
webview.goBack();
return true;
}
return super.onKeyDown(keyCode, event);
}

}

 Step 5:  Output Screen Shot


Dynamically Loading Data's (Adding Footer to ListView ) in ListView in Android


Add a footer to List View and when the user clicks that Footer, you can show parse the next set of data and show it in the list.


Step1: Create a Button

<Button android:id="@+id/footer" android:gravity="center"
android:layout_gravity="center"
android:text="My Footer"
android:layout_width="wrap_content"
android:layout_height="0dp" android:layout_weight="1"/>

Step2: Make it as Footer to the List View

ListView myList;
View footerView;
ViewGroup footerViewOriginal = (ViewGroup) findViewById(R.id.footer);
footerView = inflater2.inflate(R.layout.footer,footerViewOriginal);
footerView.findViewById(R.id.footer);
myList.addFooterView(footerView, null, true);

Step3: Create on ClickListener and write the action what you want to perform

footerView.findViewById(R.id.footer).setOnTouchListener(new OnTouchListener() {
@Override
public boolean onTouch(View v, MotionEvent event) {
return false;

}

Singleton Class in Java


           A Singleton class is used when you wish to restrict instantiation of a class to only one object.
           Suppose we have to retain the values of the Variables and want to restrict the creation of more than objects then we can use Singleton pattern.

Step 1: Create a Class which extends Observable, as i shown below

public class Viewmore extends Observable {


// create the Instance of Viewmore as static ,since make that object as class Variable

private static Viewmore instance;

private Viewmore() {
/** Default Constructor(Empty Constructor) */
}

// Create a method , which checks whether the instances is already created or not

public static Viewmore getInstance() {
if (instance == null) {
instance = new Viewmore();
}
return instance;
}

Step 2: Cerate the Singleton Object as i Shown below

class Samp {

// Create the Instance of Singleton 

Viewmore vm = Viewmore.getInstance();

}


Wednesday, April 20, 2011

Using SharedPrefrenced in Android?


Step1: create a project as Usual

Step2: create the xml and code like this


<?xml version="1.0" encoding="utf-8"?>
<RelativeLayout
xmlns:android="http://schemas.android.com/apk/res/android"
android:layout_width="fill_parent"
android:layout_height="fill_parent"
>

<ImageView
android:layout_width="fill_parent"
android:layout_height="fill_parent"
android:cropToPadding="true"
android:background="@drawable/mylog"
android:adjustViewBounds="true"

/>
</RelativeLayout>
<RelativeLayout xmlns:android="http://schemas.android.com/apk/res/android"
android:layout_width="fill_parent"
android:layout_height="fill_parent"

>
<TextView
android:text="User Name:"
android:textColor="#AF8717"
android:layout_gravity="center_horizontal"
android:layout_weight="1"
android:textSize="22sp"
android:textStyle="bold"
android:layout_marginLeft="20dp"
android:layout_marginTop="45dp"
android:layout_width="wrap_content"
android:layout_height="wrap_content"
android:id="@+id/myuserlabel"
/>

<EditText
android:layout_toRightOf="@+id/myuserlabel"
android:textColor="#AF8717"
android:layout_gravity="center_horizontal"
android:layout_weight="1"
android:textSize="22sp"
android:textStyle="bold"
android:layout_marginLeft="20dp"
android:layout_marginTop="40dp"
android:layout_width="120dp"
android:layout_height="wrap_content"
android:id="@+id/userval"
android:ellipsize="end"
/>


<TextView
android:layout_below="@+id/myuserlabel"
android:text="Password:"
android:textColor="#AF8717"
android:layout_gravity="center_horizontal"
android:layout_weight="1"
android:textSize="22sp"
android:textStyle="bold"
android:layout_marginLeft="20dp"
android:layout_marginTop="60dp"
android:layout_width="wrap_content"
android:layout_height="wrap_content"
android:id="@+id/mypwdlabel"
/>

<EditText
android:layout_toRightOf="@+id/mypwdlabel"
android:layout_marginTop="130dp"
android:textColor="#AF8717"
android:layout_weight="1"
android:textSize="22sp"
android:textStyle="bold"
android:password="true"
android:layout_marginLeft="35dp"
android:layout_width="120dp"
android:layout_height="wrap_content"
android:id="@+id/mypwdval"
android:ellipsize="end"


/>

<Button
android:layout_width="wrap_content"
android:layout_height="wrap_content"
android:text="Submit"
android:id="@+id/submit"
android:layout_below="@+id/mypwdlabel"
android:layout_marginTop="80dp"
android:layout_centerInParent="true"


/>


</RelativeLayout>

Step 3 :Java code


public class DemoActivity extends Activity
{
EditText u_name=null,pwd=null;
Button mylogin_submit;

/* Creation of Shared Preferences */

public static final String PREFS_NAME = "MyShardedprefernce";
static SharedPreferences settings;
SharedPreferences.Editor editor;

public void onCreate(Bundle savedInstanceState) {
super.onCreate(savedInstanceState);
setContentView(R.id.main);
u_name=(EditText)findViewById(R.id.userval);
pwd=(EditText)findViewById(R.id.mypwdval);
mylogin_submit = (Button)findViewById(R.id.submit);

mylogin_submit.setOnTouchListener(new OnTouchListener (){


@Override
public boolean onTouch(View arg0, MotionEvent arg1) {
// TODO Auto-generated method stub
username=u_name.getText().toString();
Log.d("UserName",username);
password=pwd.getText().toString();

//store it in shared perfernce

editor=settings.edit();
editor.putString("UserName",username);
editor.putString("Password",password);
Intent myintent=new Intent(DemoActivity.this,NewActivity.class);
startActivity(myintent);

return false;
}});


}


Step 4: Create another class , where we are reterving the value stored in Shared Prefernce


public class NewActivity extends Activity {

public static final String PREFS_NAME = "MyShardedprefernce";
static SharedPreferences settings;
String username, password;
TextView t,t1;

public void onCreate(Bundle savedInstanceState) {
super.onCreate(savedInstanceState);
setContentView(R.id.newui);
settings = getSharedPreferences(PREFS_NAME, 0);

username= settings.getString("UserName","No Data Found");
password= settings.getString("Password","No Data Found");

t=(TextView) findViewById(R.id.Username);
t1=(TextView) findViewById(R.id.pwd);

t.SetText("Welcome User:"+username);
}
}

Notification in Android Using AlarmManager, BoradCastReceiver & Services

    Our aim is to show notification message to user in a specific time.     Say For example , I have planned to show Notification ...