Monday, September 19, 2011

Creating Rounded Corners of Image in Android?


Step 1: I had created a class Image Helper

//  Import the following packages

import android.graphics.Bitmap;
import android.graphics.Canvas;
import android.graphics.Paint;
import android.graphics.PorterDuffXfermode;
import android.graphics.Rect;
import android.graphics.RectF;
import android.graphics.Bitmap.Config;
import android.graphics.PorterDuff.Mode;

public class ImageHelper {


public static Bitmap getRoundedCornerBitmap(Bitmap bitmap, int pixels) {

Bitmap output = Bitmap.createBitmap(bitmap.getWidth(), bitmap
.getHeight(), Config.ARGB_8888);
Canvas canvas = new Canvas(output);

final int color = 0xff424242;
final Paint paint = new Paint();
final Rect rect = new Rect(0, 0, bitmap.getWidth(), bitmap.getHeight());
final RectF rectF = new RectF(rect);
final float roundPx = pixels;

paint.setAntiAlias(true);
canvas.drawARGB(0, 0, 0, 0);
paint.setColor(color);
canvas.drawRoundRect(rectF, roundPx, roundPx, paint);

paint.setXfermode(new PorterDuffXfermode(Mode.SRC_IN));
canvas.drawBitmap(bitmap, rect, rect, paint);

return output;
}
}
           
Step 2: Call the above function as i shown below

Imageview icon;

icon =(ImageView) findViewById(R.id.myimageview);
String img_value="http://www.google.com/";

Bitmap mIcon11 = BitmapFactory.decodeStream(img_value
.openConnection().getInputStream());
mIcon11=ImageHelper.getRoundedCornerBitmap(mIcon11,30);

icon.setImageBitmap(mIcon11);

Monday, August 22, 2011

Generating FingerPrint using Keytool in Android

Hi All,
     
       Follow the Steps to generate the finger print using Keytool in Android in Eclipse IDE

Step 1:
          Right Click your Project and Chosse  Export as Shown in the following picture


Step 2:
           Then a Dialog Box is Open , in that Click Android , then Choose Export Android Application as Shown Below


Step 3:         
               Then Click Next, and Next for futher Processing, then you can see a option of Creating or Using the Existing KeyStore , If you are creating KeyStore, for the first time, then you can choose Create new KeyStore Option as shown below


Step 4:

               Then Locate yur KeyFile Location as Shown Below


Step 5:
                  Give password and give confrim password too and click Next for futher processing as i shown here

Step 6:
                The Next Windows ask you to provide details Alias, Password, confirm password and validity ad shown below here, Enter those details


Step 7:

      Browse your destination .apk file in the next windows, as i did below


Step 8: Hit Finish

Step 9: Now open Command Prompt and set the current path java]jdk1.6\bin
 Then use the following command

C:\Program Files\Java\jdk1.6.0_23\bin>keytool -list -alias santest -keystore "C:
\Documents and Settings\Farshore\Desktop\mykeystore\mykeyval"
Enter keystore password:
santest, Feb 16, 2011, PrivateKeyEntry,
Certificate fingerprint (MD5): 7A:8C:AC:CF:64:D7:83:4E:85:43:BF:5E:D7:65:10:B6

C:\Program Files\Java\jdk1.6.0_23\bin>


Now we can use that fingerprint in your xml file.


Friday, July 8, 2011

Setting Background Image and xml Resource

Use Layer List and Item tag for setting Image and use solid tag and set the color as #AA000000 for transparent as shown below 

   <?xml version="1.0" encoding="utf-8"?>
    <layer-list xmlns:android="http://schemas.android.com/apk/res/android">
  <item>
    <shape xmlns:android="http://schemas.android.com/apk/res/android"
        android:shape="rectangle" android:padding="10dp">
        <solid android:color="#AA000000"/>
        <corners android:bottomRightRadius="30dp"
            android:bottomLeftRadius="30dp" android:topLeftRadius="30dp"
            android:topRightRadius="30dp" />
    </shape>
    </item>
  <item> <bitmap android:src="@drawable/yourfilename"/>
</item>
 </layer-list>

Thursday, June 23, 2011

Change Android TextView Color when user pressed or Clicked TextView


Step 1: Create an XML under  res/color/text_color.xml as shown below

<?xml version="1.0" encoding="utf-8"?>
<selector xmlns:android="http://schemas.android.com/apk/res/android">
    <item android:state_pressed="true"
          android:color="#ffff0000"/> <!-- pressed -->
    <item android:state_focused="true"
          android:color="#ff0000ff"/> <!-- focused -->
    <item android:color="#ff000000"/> <!-- default -->
</selector>

Step2:  Apply it to TextView as i shown below

<TextView
    android:layout_width="fill_parent"
    android:layout_height="wrap_content"
    android:text="@string/button_text"
    android:textColor="@color/text_color" />


That's it

Tuesday, June 7, 2011

Changing the color of android list item on click or selection events?

Step1: Embbed the android:listSelector attribute in your ListView as Shown Below.


<ListView android:id="@+id/android:list" 
         android:layout_width="fill_parent"
        android:layout_height="wrap_content" 
        android:layout_below="@+id/Tablayoutdesign"
        android:cacheColorHint="#000000"
        android:dividerHeight="1dip"
        android:layout_marginTop="63dip"
        android:layout_marginBottom="40dip"

        />
 
Step2: Create a new xml named listselector and put the following code in that

<?xml version="1.0" encoding="utf-8"?>
<selector xmlns:android="http://schemas.android.com/apk/res/android"> 

  <!-- Selected --> 
  <item 
    android:state_focused="true" 
    android:state_selected="false" 
    android:drawable="@drawable/focused"/> 

  <!-- Pressed -->
  <item 
    android:state_selected="true" 
    android:state_focused="false"
    android:drawable="@drawable/selected" /> 
</selector> 

Step3: Create a file named colors.xml add the following the code in that file

<resources>
    <drawable name="focused">#ff5500</drawable>
    <drawable name="selected">#FF00FF</drawable>
</resources>
 
Add this line in your java code

ListView lv= (ListView) findViewById(R.id.list);
lv.setSelector( R.drawable.listselector);

Friday, May 20, 2011

Using JSON in Android


              JSON (JavaScript Object Notation):

                        JSON is a light weight one, which help us to interchange data in a simple manner.

            JSON is built on two structures:


1.     A collection of name/value pairs. In various languages, this is realized as an object, record, struct, dictionary, hash table, keyed list, or associative array.

For Instance in Java we refer it is an Object.

2.     An ordered list of values. In most languages, this is realized as an array, vector, list, or sequence.

For Instance in Java we refer it as array.


Rules for creating a JSON string:

A JSON string contains either an array of values, or an object (an associative array of name/value pairs).

An array is surrounded by square brackets, [ and ], and contains a comma-separated list of values.

An object is surrounded by curly brackets, { and }, and contains a comma-separated list of name/value pairs.

A name/value pair consists of a field name (in double quotes), followed by a colon (:), followed by the field value.

A value in an array or object can be:

A number (integer or floating point)

A string (in double quotes)

A boolean (true or false)

Another array (surrounded by square brackets, [ and ])

Another object (surrounded by curly brackets, { and })

The value null

  
Example of a JSON:


Starting point of JSON object so we used curly brackets


{" data ":
{ 
     "Book Title": “C world",
     “Book Author ": “Dennis Retchie”,
     "address":
“_comment”: “another JSON Object...",
    {
         "streetAddress": "21 2nd Street",
         "city": "New York",
         "state": "NY",
         "postalCode": "10021"
     },
     "phoneNumber":
“_comment”: “Starting of JSON Array...",
     [
         {
           "type": "home",
           "number": "212 555-1234"
         },
         {
           "type": "fax",
           "number": "646 555-4567"
         }
     ]
 } }

Let us fetch the Value from JSON in Android

Step 1: Create JSONObject as shown I below

private JSONObject myJSONObject=new JSONObject(),myJSONfetchdata;

            Step 2: Initialize it as I Shown Below

                        myJSONfetchdata = myJSONObject.getJSONObject(“data”);

            Step 3: Fetch the Values as I Shown Below

                        String mybooktitle   =  myJSONfetchdata.getString("Book Title");

                        String mybookauthor= myJSONfetchdata.getString("Book Author ");

                        JSONObject address =myJSONfetchdata. getJSONObject ("address");

                        String streetAddress  =address.getString("streetAddress");

                        String city  = address.getString("city");

                        String state = address.getString("state");

                        String postalCode  = address.getString("postalCode");

                        JSONArray phoneNumber =  myJSONfetchdata.getJSONArray(“phoneNumber”);

                        String[] type  =  new String[phoneNumber.length()];

                         String[]  number  = new String[phoneNumber.length()];

                        for(int z=0;z< phoneNumber.length();z++)
                         {
                                    type [z]   =  phoneNumber.getString("type ");
                                    number [z] = phoneNumber.getString("number");
                          }


Tuesday, May 10, 2011

How to Fetch Phone contacts and Show it in AutoComplete TextView in Android ?

  Step 1. Create Autocomplete in a xml file as i shown below

<AutoCompleteTextView android:paddingTop="15dp"
android:id="@+id/txtPhoneNo"
android:focusableInTouchMode="true"
android:layout_width="fill_parent"
android:layout_height="wrap_content"
android:imeOptions="actionDone"/>

Step 2. Add the following permission in your Android Mainfeast file for accessing contacts

<uses-permission android:name="android.permission.READ_CONTACTS" />

Step 3. Create an Activity and maps the autocompletetextview component in your Java Code

public class MyContacts extends Activity {

AutoCompleteTextView txtPhoneNo;


public ArrayList<String> c_Name = new ArrayList<String>();
public ArrayList<String> c_Number = new ArrayList<String>();
String[] name_Val=null;
String[] phone_Val=null;

@Override
public void onCreate(Bundle icicle)
{
super.onCreate(icicle);
txtPhoneNo = (AutoCompleteTextView) findViewById(R.id.txtPhoneNo);

}

Step 4: Use ContentReslover to fetch the contacts, if you are running it in Android 1.6 or before version use people class for fetching contacts and add that contacts in an Array List as i shown below

ContentResolver cr1 = getContentResolver();

String[] projection = new String[] { People._ID,People.NAME,People.NUMBER };

Uri phone_contacts = People.CONTENT_URI;

Cursor managedCursor = cr1.query(phone_contacts, projection, null, null, People.NAME + " ASC");

if (managedCursor.moveToFirst()) {

String contactname;
String cphoneNumber;
int nameColumn = managedCursor.getColumnIndex(People.NAME);
int phoneColumn = managedCursor.getColumnIndex(People.NUMBER);
Log.d("int Name",Integer.toString(nameColumn));
Log.d("int Number",Integer.toString(phoneColumn));


do {
// Get the field values
contactname = managedCursor.getString(nameColumn);
cphoneNumber = managedCursor.getString(phoneColumn);
if((contactname != " " || contactname != null) && (cphoneNumber!= " " ||cphoneNumber!= null))
{

c_Name.add(contactname);
c_Number.add(cphoneNumber);
}


} while (managedCursor.moveToNext());

}


// Donot use People class if your using android1.6 above

Uri contacts = Uri.parse("content://icc/adn");

Cursor managedCursor1 =cr.query(contacts, null, null, null, null);

if (managedCursor1.moveToFirst()) {

String contactname;
String cphoneNumber;

int nameColumn = managedCursor1.getColumnIndex("name");
int phoneColumn = managedCursor1.getColumnIndex("number");

Log.d("int Name",Integer.toString(nameColumn));
Log.d("int Number",Integer.toString(phoneColumn));


do {
// Get the field values
contactname = managedCursor1.getString(nameColumn);
cphoneNumber = managedCursor1.getString(phoneColumn);
if((contactname != " " || contactname != null) && (cphoneNumber!= " " ||cphoneNumber!= null))
{

c_Name.add(contactname);
c_Number.add(cphoneNumber);
}

} while (managedCursor1.moveToNext());

}


Step 5: Now convert the ArrayList to Array and set that Array to AutoComplete as i Shown Below

name_Val = (String[]) c_Name.toArray(new String[c_Name.size()]);
phone_Val= (String[]) c_Number.toArray(new String[c_Name.size()]); ArrayAdapter<String> adapter = new ArrayAdapter<String>(this,android.R.layout.simple_dropdown_item_1line, name_Val);
txtPhoneNo.setAdapter(adapter);

Friday, April 22, 2011

Publishing FaceBook Checkin a place in Android


Step 1: In-order to publish a place via checkin we are in need of the following parameters

1. Access Token
2. Place which is to be Checkin
3. Message which will display to your friends
4. Latitude and Longitude of that place
5. Tag i.e. User Id

Step 2: Use Bundle to wrap the above parameters

Bundle params = new Bundle();
params.putString("access_token", Main.access);
params.putString("place", "203682879660695");
params.putString("Message","I m here in this place");
JSONObject coordinates = new JSONObject();
coordinates.put("latitude", Main.mylat);
coordinates.put("longitude", Main.mylong);
params.putString("coordinates",coordinates.toString());
JSONArray frnd_data=new JSONArray();
params.putString("tags", "xxxx");//where xx indicates the User Id

Step 3:  Call the Request method and check whether proper response you had got

String response = faceBook.request("me/checkins", params, "POST");
Log.d("Response",response);

Adding Tabs dynamically in Android


Step 1: Create a xml name tabhost.xml, for desigining the Tab Host, as i shown below
<?xml version="1.0" encoding="utf-8"?>
<TabHost xmlns:android="http://schemas.android.com/apk/res/android"
android:id="@android:id/tabhost"
android:layout_width="fill_parent"
android:layout_height="fill_parent">
<LinearLayout
android:orientation="vertical"
android:layout_width="fill_parent"
android:layout_height="fill_parent"
android:padding="5dp">
<TabWidget
android:id="@android:id/tabs"
android:layout_width="fill_parent"
android:layout_height="wrap_content"
android:tag="tabPane"
/>
<RelativeLayout
android:orientation="vertical"
android:layout_width="fill_parent"
android:layout_height="wrap_content">
<EditText
android:id="@+id/address_bar"
android:layout_width="270px"
android:layout_height="50px"
android:layout_alignParentLeft="true"
android:layout_alignParentTop="true"
/>
<ImageButton
android:id="@+id/add_btn"
android:layout_width="50px"
android:layout_height="50px"
android:src="@android:drawable/ic_menu_add"
android:background="@android:color/transparent"
android:layout_toRightOf="@id/address_bar"
/>

</RelativeLayout>
<FrameLayout
android:id="@android:id/tabcontent"
android:layout_width="fill_parent"
android:layout_height="fill_parent"
android:padding="2dp" />
</LinearLayout>
</TabHost>


Step 2:  Create a Activity which extends TabActitvity as i shown below


public class Main extends TabActivity{

private TabHost tabHost;
private EditText addressBar;
  private final static String DEFAULT_URL = "http://www.google.com/";
private int z = 0;
private String SanTest=null;

/** Called when the activity is first created. */
@Override
public void onCreate(Bundle savedInstanceState) {
super.onCreate(savedInstanceState);
setContentView(R.layout.tabs_main);

this.tabHost = getTabHost(); // The activity TabHost
this.addressBar = (EditText) findViewById(R.id.address_bar);
this.addressBar.setText(DEFAULT_URL);


ImageButton addBtn = (ImageButton) findViewById(R.id.add_btn);

addBtn.setOnClickListener(new OnClickListener() {

@Override
public void onClick(View v) {

  addMethod();  // Method which adds the Tab Host
}
});
Intent openBrowser = new Intent();
openBrowser.setClass(Main.this, Browser1.class);
openBrowser.putExtra("URL", DEFAULT_URL);
SanTest=Intent.CATEGORY_LAUNCHER;
Log.d("SanTest",SanTest);
tabHost.addTab(tabHost.newTabSpec("Main").setIndicator(getHost(DEFAULT_URL)).setContent(openBrowser));


}


private void addMethod() {

String webSiteURL = validateURL(addressBar.getText().toString().trim());
String webSiteName = getHost(webSiteURL);

Intent openBrowser = new Intent();
openBrowser.setClass(this, Browser1.class);
openBrowser.putExtra("URL", webSiteURL);

tabHost.addTab(tabHost.newTabSpec(webSiteName + Integer.toString(z)).setIndicator(webSiteName).setContent(openBrowser));
Log.d("z",Integer.toString(z));
++z;

}

private void deleteMethod() {

// Since we can't really delete a TAB
// We hide it

int position = tabHost.getCurrentTab();
Log.d("Position",Integer.toString(position));


// if (position != 0 ) {
//
// tabHost.getCurrentTabView().setVisibility(1);
// tabHost.setCurrentTab(position-1);
//
// }
// else if(position== z){
// tabHost.getCurrentTabView().setVisibility(1);
// tabHost.setCurrentTab(position+1);
// }
Log.d("Z val in delete()",Integer.toString(z));
if(position >0)
{
tabHost.getCurrentTabView().setVisibility(View.GONE);
tabHost.setCurrentTab(position+1);
z-=1;
if(z<0)
z=0;
}
else if(position == 0)
{
tabHost.getCurrentTabView().setVisibility(View.GONE);
tabHost.setCurrentTab(position+1);
z=0;
}
else if(position == z)
{
tabHost.getCurrentTabView().setVisibility(View.GONE);
tabHost.setCurrentTab(z-1);
Log.d("Z value in final","lol");
Log.d("Pos",Integer.toString(position));
Log.d("z pos",Integer.toString(z));


}


}

// Inflates menu when "menu Key" is pressed
@Override
public boolean onCreateOptionsMenu(Menu menu) {
MenuInflater inflater = getMenuInflater();
inflater.inflate(R.menu.title_icon, menu);
return true;
}

// This method is called once the menu is selected
@Override
public boolean onOptionsItemSelected(MenuItem item) {


switch (item.getItemId()) {

case R.id.add:

addMethod();

break;

case R.id.delete:

deleteMethod();

break;
}
return true;
}

private String validateURL(String url) {

StringBuffer urlB = new StringBuffer();

// checks if addressBar has a valid URL
// you can add stuff here in order to validate
// this is just an example
if (url.startsWith("http://")) {urlB.append(url);} else {urlB.append("http://");}

try {
URL urlTry = new URL(urlB.toString());

return urlB.toString();

} catch (MalformedURLException e) {

return "http://www.google.com/";
}
}

private String getHost(String url) {

try {

URL urlTry = new URL(url);

return urlTry.getHost().replace("www.", "").replace(".com", "").replace(".org", "").replace(".net", "");

} catch (MalformedURLException e) {

return "Browser";
}
}

}
 
Step 3:  Inside an XML , which will display the Web View

<?xml version="1.0" encoding="utf-8"?>
<LinearLayout
android:layout_width="fill_parent"
android:layout_height="fill_parent"
xmlns:android="http://schemas.android.com/apk/res/android"
android:orientation="vertical"
>
<WebView
android:layout_width="fill_parent"
android:layout_height="fill_parent"
android:id="@+id/webview"

/>
</LinearLayout>

Step 4:  Create the Activity which load the url in WebView

public class Browser1 extends Activity {

private WebView webview;

private String URL;


@Override
public void onCreate(Bundle savedInstanceState) {
super.onCreate(savedInstanceState);
setContentView(R.layout.broswer);
webview = (WebView) findViewById(R.id.webview);

Bundle extras = getIntent().getExtras();
Log.d("I m before If","1");
if (extras == null) {
Log.d("I m in if condition","1");
URL = "http://www.google.org/";

} else {
Log.d("I m in else condition","2");
this.URL = extras.getString("URL");
Log.d("URL",this.URL);
}

getWebView();

}

public void getWebView() {
//Log.d("GetWebView Invoked", URL);
webview.loadUrl(URL);
webview.setWebViewClient(new HelloWebViewClient());
webview.getSettings().setJavaScriptEnabled(true);

}

private class HelloWebViewClient extends WebViewClient {

@Override
public boolean shouldOverrideUrlLoading(WebView view, String url) {
view.loadUrl(url);
return true;
}
}

public boolean onKeyDown(int keyCode, KeyEvent event) {
if ((keyCode == KeyEvent.KEYCODE_BACK) && webview.canGoBack()) {
webview.goBack();
return true;
}
return super.onKeyDown(keyCode, event);
}

}

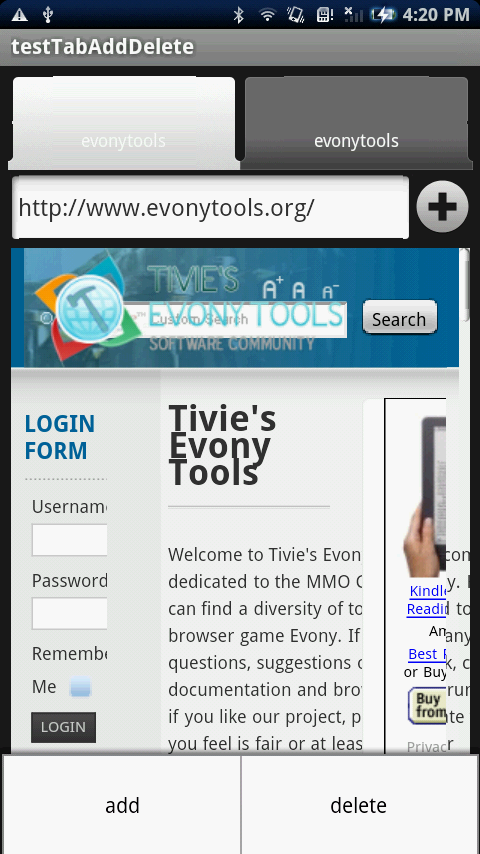
 Step 5:  Output Screen Shot


Dynamically Loading Data's (Adding Footer to ListView ) in ListView in Android


Add a footer to List View and when the user clicks that Footer, you can show parse the next set of data and show it in the list.


Step1: Create a Button

<Button android:id="@+id/footer" android:gravity="center"
android:layout_gravity="center"
android:text="My Footer"
android:layout_width="wrap_content"
android:layout_height="0dp" android:layout_weight="1"/>

Step2: Make it as Footer to the List View

ListView myList;
View footerView;
ViewGroup footerViewOriginal = (ViewGroup) findViewById(R.id.footer);
footerView = inflater2.inflate(R.layout.footer,footerViewOriginal);
footerView.findViewById(R.id.footer);
myList.addFooterView(footerView, null, true);

Step3: Create on ClickListener and write the action what you want to perform

footerView.findViewById(R.id.footer).setOnTouchListener(new OnTouchListener() {
@Override
public boolean onTouch(View v, MotionEvent event) {
return false;

}

Singleton Class in Java


           A Singleton class is used when you wish to restrict instantiation of a class to only one object.
           Suppose we have to retain the values of the Variables and want to restrict the creation of more than objects then we can use Singleton pattern.

Step 1: Create a Class which extends Observable, as i shown below

public class Viewmore extends Observable {


// create the Instance of Viewmore as static ,since make that object as class Variable

private static Viewmore instance;

private Viewmore() {
/** Default Constructor(Empty Constructor) */
}

// Create a method , which checks whether the instances is already created or not

public static Viewmore getInstance() {
if (instance == null) {
instance = new Viewmore();
}
return instance;
}

Step 2: Cerate the Singleton Object as i Shown below

class Samp {

// Create the Instance of Singleton 

Viewmore vm = Viewmore.getInstance();

}


Wednesday, April 20, 2011

Using SharedPrefrenced in Android?


Step1: create a project as Usual

Step2: create the xml and code like this


<?xml version="1.0" encoding="utf-8"?>
<RelativeLayout
xmlns:android="http://schemas.android.com/apk/res/android"
android:layout_width="fill_parent"
android:layout_height="fill_parent"
>

<ImageView
android:layout_width="fill_parent"
android:layout_height="fill_parent"
android:cropToPadding="true"
android:background="@drawable/mylog"
android:adjustViewBounds="true"

/>
</RelativeLayout>
<RelativeLayout xmlns:android="http://schemas.android.com/apk/res/android"
android:layout_width="fill_parent"
android:layout_height="fill_parent"

>
<TextView
android:text="User Name:"
android:textColor="#AF8717"
android:layout_gravity="center_horizontal"
android:layout_weight="1"
android:textSize="22sp"
android:textStyle="bold"
android:layout_marginLeft="20dp"
android:layout_marginTop="45dp"
android:layout_width="wrap_content"
android:layout_height="wrap_content"
android:id="@+id/myuserlabel"
/>

<EditText
android:layout_toRightOf="@+id/myuserlabel"
android:textColor="#AF8717"
android:layout_gravity="center_horizontal"
android:layout_weight="1"
android:textSize="22sp"
android:textStyle="bold"
android:layout_marginLeft="20dp"
android:layout_marginTop="40dp"
android:layout_width="120dp"
android:layout_height="wrap_content"
android:id="@+id/userval"
android:ellipsize="end"
/>


<TextView
android:layout_below="@+id/myuserlabel"
android:text="Password:"
android:textColor="#AF8717"
android:layout_gravity="center_horizontal"
android:layout_weight="1"
android:textSize="22sp"
android:textStyle="bold"
android:layout_marginLeft="20dp"
android:layout_marginTop="60dp"
android:layout_width="wrap_content"
android:layout_height="wrap_content"
android:id="@+id/mypwdlabel"
/>

<EditText
android:layout_toRightOf="@+id/mypwdlabel"
android:layout_marginTop="130dp"
android:textColor="#AF8717"
android:layout_weight="1"
android:textSize="22sp"
android:textStyle="bold"
android:password="true"
android:layout_marginLeft="35dp"
android:layout_width="120dp"
android:layout_height="wrap_content"
android:id="@+id/mypwdval"
android:ellipsize="end"


/>

<Button
android:layout_width="wrap_content"
android:layout_height="wrap_content"
android:text="Submit"
android:id="@+id/submit"
android:layout_below="@+id/mypwdlabel"
android:layout_marginTop="80dp"
android:layout_centerInParent="true"


/>


</RelativeLayout>

Step 3 :Java code


public class DemoActivity extends Activity
{
EditText u_name=null,pwd=null;
Button mylogin_submit;

/* Creation of Shared Preferences */

public static final String PREFS_NAME = "MyShardedprefernce";
static SharedPreferences settings;
SharedPreferences.Editor editor;

public void onCreate(Bundle savedInstanceState) {
super.onCreate(savedInstanceState);
setContentView(R.id.main);
u_name=(EditText)findViewById(R.id.userval);
pwd=(EditText)findViewById(R.id.mypwdval);
mylogin_submit = (Button)findViewById(R.id.submit);

mylogin_submit.setOnTouchListener(new OnTouchListener (){


@Override
public boolean onTouch(View arg0, MotionEvent arg1) {
// TODO Auto-generated method stub
username=u_name.getText().toString();
Log.d("UserName",username);
password=pwd.getText().toString();

//store it in shared perfernce

editor=settings.edit();
editor.putString("UserName",username);
editor.putString("Password",password);
Intent myintent=new Intent(DemoActivity.this,NewActivity.class);
startActivity(myintent);

return false;
}});


}


Step 4: Create another class , where we are reterving the value stored in Shared Prefernce


public class NewActivity extends Activity {

public static final String PREFS_NAME = "MyShardedprefernce";
static SharedPreferences settings;
String username, password;
TextView t,t1;

public void onCreate(Bundle savedInstanceState) {
super.onCreate(savedInstanceState);
setContentView(R.id.newui);
settings = getSharedPreferences(PREFS_NAME, 0);

username= settings.getString("UserName","No Data Found");
password= settings.getString("Password","No Data Found");

t=(TextView) findViewById(R.id.Username);
t1=(TextView) findViewById(R.id.pwd);

t.SetText("Welcome User:"+username);
}
}

Creating Custom Text View in Android?


Step 1: Create a Layout in xml file as i did below

<LinearLayout android:id="@+id/san_tag" android:layout_width="wrap_content" android:layout_height="wrap_content">


</LinearLayout>

Step 2:  Now Map that Layout in Java Code as i Shown Below

LinearLayout navagtion_bar;
String myarray[]={"Foot Ball","Basket Ball","Cricket"};
@Override
public void onCreate(Bundle savedInstanceState) {

super.onCreate(savedInstanceState);
setContentView(R.layout.main);
navagtion_bar= (LinearLayout) findViewById(R.id.san_tag);// Map the Layout
 TextView bs_text[]= new TextView[myarray.length]; // Create TextView according to value in length variable;

for(int z=0;z< myarray.length] ;z++)
{
try
{

bs_text[z] = (TextView) new TextView(this);
bs_text[z].setText( myarray [z]);
bs_text[z].setTextSize(15);
bs_text[z].setBackgroundColor(android.graphics.Color.TRANSPARENT);
bs_text[z].setTextColor(android.graphics.Color.BLACK);
navagtion_bar.addView(bs_text[z]);
}
}
catch(ArrayIndexOutOfBoundsException e)
{
Log.d("ArrayIndexOutOfBoundsException",e.toString());
}
}

Step 3: Set the Click Listener Custom TextView

do
{

    bs_text[y].setOnClickListener(new OnClickListener() {
@Override
public void onClick(View v) {
           Log.d("I m clicked","Y Value"+Integer.toString(y));
    });
y--;
}while(y>=0);


Saturday, April 16, 2011

Parsing Data from XML Using DOM & Displaying it in a ListView in Android ?


Notice three methods which i had shown below, they are
1. getElementsByTagName - Mention the tag which you want to parse
2.getChildNodes - retervies the child node
3.getNodeValue()- with the help of this method you can access the
value of particular tag


Step 1 : Create a List View in the xml as i shown below

<?xml version="1.0" encoding="utf-8"?>
<LinearLayout xmlns:android="http://schemas.android.com/apk/res/android"
android:orientation="vertical"
android:layout_width="fill_parent"
android:layout_height="fill_parent" >

<ListView android:id="@+id/mylistview" android:layout_width="fill_parent" android:layout_height="fill_parent"></ListView>

</LinearLayout>

Step 2:  Now Create an XML which determines the Inner Content of List View

<?xml version="1.0" encoding="utf-8"?>
<RelativeLayout
xmlns:android="http://schemas.android.com/apk/res/android"
android:layout_width="fill_parent"
android:layout_height="fill_parent">

<ImageView android:id="@+id/myimgview" android:layout_width="wrap_content" android:layout_height="wrap_content" />

<TextView android:layout_toRightOf="@+id/myimgview" android:id="@+id/mytextview" android:layout_width="wrap_content" android:layout_height="wrap_content" />

</RelativeLayout>


Step 3:  Now Create a Activity which maps the List View in the XML

import android.app.Activity;
import android.app.ProgressDialog;
import android.content.Context;
import android.os.AsyncTask;
import android.os.Bundle;
import android.widget.ListView;

public class MyActivity extends Activity {

ListView listcomp=null;
 MyAdapter adapt_obj=null; // Create a Object for Adapter Class
Context myref=null;

/** Called when the activity is first created. */
@Override
public void onCreate(Bundle savedInstanceState) {
super.onCreate(savedInstanceState);
setContentView(R.layout.main);
  listcomp=(ListView)findViewById(R.id.mylistview); // Map the List View Here
myref=MyActivity.this;
  new MyAsyncTask().execute(); // Call the Async Task

}

private class MyAsyncTask extends AsyncTask<Void,Void,Void>{

private final ProgressDialog dialog=new ProgressDialog(MyActivity.this);

@Override
protected Void doInBackground(Void... params) {
// TODO Auto-generated method stub
  adapt_obj=new MyAdapter(myref,"http://synd.cricbuzz.com/score-gadget/gadget-scores-feed.xml");

return null;
}

@Override
protected void onPreExecute()
{
dialog.setMessage("Loading ...");
dialog.show();
dialog.setCancelable(false);
}

@Override
protected void onPostExecute(Void result)
{
if(dialog.isShowing() == true)
{
dialog.dismiss();
}
listcomp.setAdapter(adapt_obj);
adapt_obj.notifyDataSetChanged();
}
}
}

Step 4: Create a Adapter which extends Base Adapter


import java.io.InputStream;

import android.content.Context;
import android.graphics.Bitmap;
import android.graphics.BitmapFactory;
import android.util.Log;
import android.view.LayoutInflater;
import android.view.View;
import android.view.ViewGroup;
import android.widget.BaseAdapter;
import android.widget.ImageView;
import android.widget.TextView;

public class MyAdapter extends BaseAdapter {

LayoutInflater inflation=null;
Context mycontext=null;
String urlvalue=null,roottag=null,parseelement=null;
MyParser myparseobj=null;
String[] title_array=null,image_array=null;

MyAdapter(Context c,String url)
{
Log.d("1","1");
mycontext=c;
inflation=LayoutInflater.from(mycontext);
myparseobj=new MyParser();
  title_array=myparseobj.xmlParsing(url,"match","description");
  image_array=myparseobj.xmlParsing(url," match ","image");
}


@Override
public int getCount() {
// TODO Auto-generated method stub
Log.d("title_array",title_array.length+"");
return title_array.length;
}

@Override
public Object getItem(int position) {
// TODO Auto-generated method stub
return position;
}

@Override
public long getItemId(int position) {
// TODO Auto-generated method stub
return position;
}

@Override
public View getView(int position, View convertView, ViewGroup parent) {
// TODO Auto-generated method stub
MyHolder holder=new MyHolder();;
if(convertView == null)
{
convertView=inflation.inflate(R.layout.listcontent, null);

holder.tv=(TextView)convertView.findViewById(R.id.mytextview);
holder.iv=(ImageView)convertView.findViewById(R.id.myimgview);


}
else
{
holder.tv=(TextView)convertView.findViewById(R.id.mytextview);
holder.iv=(ImageView)convertView.findViewById(R.id.myimgview);

}

holder.tv.setText(title_array[position]);
try{
String temp=image_array[position];
InputStream is= new java.net.URL(temp).openStream();
Bitmap b=BitmapFactory.decodeStream(is);
holder.iv.setImageBitmap(b);
}
catch(Exception e){}

return convertView;
}

static class MyHolder
{
TextView tv=null;ImageView iv=null;
}
}

Step 5:  Parse the Given Url, using DOM or SAX,  I had used DOM

import java.io.IOException;
import java.net.MalformedURLException;
import java.net.URL;
//import java.util.ArrayList;

import javax.xml.parsers.DocumentBuilder;
import javax.xml.parsers.DocumentBuilderFactory;
import javax.xml.parsers.ParserConfigurationException;

import org.w3c.dom.Document;
import org.w3c.dom.Node;
import org.w3c.dom.NodeList;
import org.xml.sax.InputSource;
import org.xml.sax.SAXException;

import android.util.Log;

public class MyParser {

public String[] xmlParsing(String fetchurl,String roottag,String parseelemnt)
{
String[] temp=null;
URL url=null;
Log.d("I m Here","2");
try {
url = new URL(fetchurl);
} catch (MalformedURLException e) {
// TODO Auto-generated catch block
Log.d("I got Exception","3");
e.printStackTrace();
}
DocumentBuilderFactory dbf = DocumentBuilderFactory.newInstance();
DocumentBuilder db=null;
try {
db = dbf.newDocumentBuilder();
}
catch (ParserConfigurationException e1) {
e1.printStackTrace();
Log.d("I m Here","4");
}
Document doc=null;
try {
doc = db.parse(new InputSource(url.openStream()));
} catch (SAXException e2) {
// TODO Auto-generated catch block
Log.d("I m Here","5");
e2.printStackTrace();
} catch (IOException e3) {
// TODO Auto-generated catch block
Log.d("I m Here","6");
e3.printStackTrace();
}
org.w3c.dom.Element elt=doc.getDocumentElement();
NodeList nodeList = elt.getElementsByTagName(roottag);
temp=new String[nodeList.getLength()];
Log.d("the length of nodelist",Integer.toString(nodeList.getLength()));


for (int i = 0; i < nodeList.getLength(); i++)
{
Node node = nodeList.item(i);

NodeList titleList = node.getChildNodes();
Log.d("The length of titlelist",Integer.toString(titleList.getLength()));


for(int j=0;j<titleList.getLength();j++)
{
Node node1= titleList.item(j);
String name = node1.getNodeName();

if (name.equalsIgnoreCase(parseelemnt)) {

Log.d("J value"," "+j);
temp[i]=node1.getFirstChild()
.getNodeValue();

Log.d("temp value",temp[i]);
}
}
}


return(temp);


}

}


Thursday, April 7, 2011

Performing Animation in Android


Step1: create anim folder under res directory in ur project.

Step2: create an slideleft.xml file

Step3: type the following code in that file

<?xml version="1.0" encoding="utf-8"?>
<set xmlns:android="http://schemas.android.com/apk/res/android"
android:interpolator="@android:anim/accelerate_interpolator">
<translate android:fromXDelta="100%p" android:toXDelta="0"
android:duration="400" />
</set>

step 4: similarly create slideright.xml

step5: use the above code, but change the following

<translate android:fromXDelta="-100%p" android:toXDelta="0"
android:duration="400" />

step 6:

target.startAnimation(AnimationUtils.loadAnimation(HomeScreen.this, R.anim.slide_left));

perfroming fadein operation, just add the following code in fadein.xml file

<?xml version="1.0" encoding="utf-8"?>

<alpha xmlns:android="http://schemas.android.com/apk/res/android"
android:interpolator="@android:anim/accelerate_interpolator"
android:fromAlpha="0.0" android:toAlpha="1.0"
android:duration="300" />

similarly for fade out too

<?xml version="1.0" encoding="UTF-8"?>
<alpha xmlns:android="http://schemas.android.com/apk/res/android"
android:interpolator="@android:anim/accelerate_interpolator"
android:fromAlpha="1.0" android:toAlpha="0.0"
android:duration="300" />

Creating a Splash Screen in Android

Creating a Splash Screen in App in Android.

Android Project Structure:

src folder has packages which contains our source code

gen folder which is generated by android complier to map the xml components in Java code.

res folder contains drawable , layout, anim, raw,values folder, drawable is manily for image handling and layout folder contains xml codes and anim folder is for holding animation files and raw folder is storing for excel files as well as Music files and values folder hold the gobal variables.

Step 1: For Designing an UI, we have to code in xml,

Create a xml file, namely myui.xml Note: use small char when you naming the xml files

The first line of your xml must be this line to indicate to android complier which version and encoding type of our xml is using

<?xml version="1.0" encoding="utf-8"?>

Then create a Layout , we have four different types of layout, they are Linear Layouts and Relative Layouts and Absolute Layout and Table Layout.

Linear layout is used when the UI components are arranged in an linear manner either in horizontal or veritical.

Relative Layout is used when there is a relationship b/w the UI componenets

Absolute layout is used when UI components are hardcoded.

Tablelayout is when the UI has to be arranged in the form of Rows and Columns.


For Splash Screen App, we choose Linear layout and set the Image as background to Linear layout as i shown below

<LinearLayout
android:layout_width="fill_parent"
android:layout_height="fill_parent"
android:background="@drawable/mysplashimg">


Step2: Creating Java Code

Extend your java class from android Activity class, and donot forget to override onCreate method


package declaration

public class MyActivity extends Activity
{

// create and set value for CountDown Timer Object

MyCount counter = new MyCount(5000, 1000);

@Override
public void onCreate(Bundle savedInstanceState) {

super.onCreate(savedInstanceState);

// Map your UI in xml here as shown i below

setContentView(R.layout.myui);

counter.start(); // Start the Count Down Timer
}
}

Step 3: Create a Class which extends CountDown Timer


class MyCount extends CountDownTimer {

public MyCount(long millisInFuture, long countDownInterval) {
super(millisInFuture, countDownInterval);

}

public void onFinish() {

// Finish your Splash screen and Jump to other Activity with the help of Intent

Intent my_intentObj= new Intent(Currentclass.this, Movableclass.class);

startActivity( my_intentObj);
}

@Override
public void onTick(long millisUntilFinished) {

// TODO Auto-generated method stub
}
}

Thursday, March 17, 2011

Displaying Alert Dialog within another Alert Dialog in Android ?

Hi All, Let us know see, how to create an Alert Dialog inside another Alert Dialog?

Step 1: Create a Alert Dialog as i shown below and implement click Listener as i shown below

package com.san.test;

import java.io.IOException;

import android.app.Activity;
import android.app.AlertDialog;
import android.content.ActivityNotFoundException;
import android.content.Context;
import android.content.DialogInterface;
import android.content.Intent;
import android.content.DialogInterface.OnClickListener;
import android.net.Uri;
import android.os.Bundle;
import android.view.View;
import android.widget.Button;

public class MyActivity extends Activity {

/** Called when the activity is first created. */

Context ctx=null;
Button b=null;
@Override
public void onCreate(Bundle savedInstanceState) {
super.onCreate(savedInstanceState);
setContentView(R.layout.main);

b=(Button )findViewById(R.id.test1);
ctx=this;
b.setOnClickListener(new android.view.View.OnClickListener(){

@Override
public void onClick(View arg0) {
// TODO Auto-generated method stub

displayAlert();

}}

);


}

public void displayAlert()
{

OnClickListener btnOnClick = new OnClickListener() {
@Override
public void onClick(DialogInterface dialog, int which) {
if (which == DialogInterface.BUTTON_POSITIVE) {


new AlertDialog.Builder(ctx).setMessage("BUTTON_POSITIVE")
.setTitle("Alert Postive ")
.setCancelable(true)
.setNeutralButton(android.R.string.ok,
new DialogInterface.OnClickListener() {
public void onClick(DialogInterface dialog, int whichButton){
finish();
}
})
.show();


} else if(which == DialogInterface.BUTTON_NEGATIVE){
new AlertDialog.Builder(ctx).setMessage("BUTTON_NEGATIVE")
.setTitle("Alert Negative")
.setCancelable(true)
.setNeutralButton(android.R.string.ok,
new DialogInterface.OnClickListener() {
public void onClick(DialogInterface dialog, int whichButton){
finish();
}
})
.show();

} else if(which == DialogInterface.BUTTON_NEUTRAL) {
// More Info
new AlertDialog.Builder(ctx).setMessage("BUTTON_NEUTRAL")
.setTitle("Alert Neutral")
.setCancelable(true)
.setNeutralButton(android.R.string.ok,
new DialogInterface.OnClickListener() {
public void onClick(DialogInterface dialog, int whichButton){
finish();
}
})
.show();
}
}
};


AlertDialog promptInstall = new AlertDialog.Builder(ctx).setTitle("First Alert")
.setMessage(
"mY First Alert")
.setPositiveButton("OK", btnOnClick).setNegativeButton(
"Cancel", btnOnClick).setNeutralButton("More Info",
btnOnClick).create();

promptInstall.show();
}
}


See the images

Dispalying Toast Message in a Service in Android?

Hi All, Let us how to create Toast Message in Service

 Step 1:  Create a Handler and thread as i shown below

import android.app.Service;
import android.content.Intent;
import android.os.Bundle;
import android.os.Handler;
import android.os.IBinder;
import android.os.Message;
import android.widget.Toast;

public class MyService extends Service{

String msg="I m Toast";

Thread t = new Thread(){
public void run(){

Message myMessage=new Message();
Bundle resBundle = new Bundle();
resBundle.putString("status", "SUCCESS");
myMessage.obj=resBundle;
handler.sendMessage(myMessage);
}
};


private Handler handler = new Handler() {
@Override
public void handleMessage(Message msg) {
Toast.makeText(getApplicationContext(), "msg", Toast.LENGTH_LONG).show();
}
};


@Override
public IBinder onBind(Intent intent) {
// TODO Auto-generated method stub

return null;
}

@Override
public void onCreate() {
 t.start();
}


}


Friday, March 11, 2011

Checking Internet Connection and Displaying Alert Dialog Box in Android

Hi Friends, Let us know, how to display Alert Dialog in Android

Step 1: I had checked Alert Message , when the Internet is Disconnected.

  So created a method, which checks the Internet Connection

public boolean netCheck()
{
ConnectivityManager conMgr = (ConnectivityManager)getSystemService(Context.CONNECTIVITY_SERVICE);

if ( conMgr.getNetworkInfo(0).getState() == NetworkInfo.State.DISCONNECTED
|| conMgr.getNetworkInfo(1).getState() == NetworkInfo.State.DISCONNECTED ) {
//notify user you are not online
bs_netcheck =true;

}
return bs_netcheck;
}


Step 2: Create a Method which Shows Alert Dialog as i shown below

public void displayAlert()
{
new AlertDialog.Builder(this).setMessage("Please Check Your Internet Connection and Try Again")
.setTitle("Network Error")
.setCancelable(true)
.setNeutralButton(android.R.string.ok,
new DialogInterface.OnClickListener() {
public void onClick(DialogInterface dialog, int whichButton){
finish();
}
})
.show();
}


Step 3: Now Call this method  as i shown below
Boolean  bs_netcheck=false;
bs_netcheck = netCheck();
if(bs_netcheck == true)
{
displayAlert();
}


Friday, March 4, 2011

Adding Gradient Effects to Android Button?

Hi  All, Let us How to add gradient effects to default Android Buttons

Step 1: Create a Xml under drawable folder, i had created a XML file called custombutton

<?xml version="1.0" encoding="utf-8"?>
<selector
xmlns:android="http://schemas.android.com/apk/res/android">

<item android:state_pressed="true" >
<shape>
<gradient
android:startColor="#ff5500"
android:endColor="#999999"
android:angle="270" />
<stroke
android:width="3dp"
android:color="#999999" />
<corners
android:radius="3dp" />
<padding
android:left="10dp"
android:top="10dp"
android:right="10dp"
android:bottom="10dp" />
</shape>
</item>

<item android:state_focused="true" >
<shape>
<gradient
android:endColor="#ff5500"
android:startColor="#999999"
android:angle="270" />
<stroke
android:width="3dp"
android:color="#999999" />
<corners
android:radius="3dp" />
<padding
android:left="10dp"
android:top="10dp"
android:right="10dp"
android:bottom="10dp" />
</shape>
</item>

<item>
<shape
android:shape="rectangle">

<gradient android:type="radial" android:gradientRadius="50"
android:startColor="#999999" android:endColor="#000000" />
<!-- <corners-->
<!-- android:radius="10dp" />-->
<corners android:bottomRightRadius="7dp" android:bottomLeftRadius="7dp"
android:topLeftRadius="7dp" android:topRightRadius="7dp"/>
</shape>
</item>
</selector>

Step2: Apply this to your Button by Just calling this file to the Background  of Button , as i had shown below

<Button android:text=" Back" android:id="@+id/back" android:background="@drawable/custombuttonnew"
android:cursorVisible="true"
android:layout_width="wrap_content" android:layout_height="wrap_content"
android:layout_centerVertical="true" />

That's it


Tuesday, March 1, 2011

Login Based Application in Android using SQLite DataBase

Hi , Let us See how to Create a Login Based Application in Android.

My Aim is , i have to display SignUp Page,when the User access my application for the first time,after that i want to display login page and make a check on it.

Step 1: How to Know that the device interacting with my application for first time.
For that, we have to get DeviceId of that Device. With the Help of Telephony Manager it's possible to get the Device Id of a Device.
The code is

String device_id;
TelephonyManager telemngr = (TelephonyManager) getSystemService(TELEPHONY_SERVICE);
device_id=telemngr.getDeviceId();

Step2:  How to Create DataBase in Android
I had used SQLite Open Browser to create my database file in assets folder of my project. I had created a table namely login_details with fileds such as username and password and confpassword and deviceid. To Download SQLite Open Browser, pls click this link  http://sourceforge.net/projects/sqlitebrowser/

Step 3: Create a Class which is extends from SQLiteOpenHelper, this is the class which help us to create and mange database. A Sample Code Snippet of this Class

public class MyDBHelper extends SQLiteOpenHelper{
//Declaring Local Variables for database name , and database path and sqlite object and my context
private static String DB_PATH = "";
private static final String DB_NAME = "frnd.db"; // i had created this in my assets folder
private SQLiteDatabase myDataBase;
private final Context myContext;
private static MyDBHelper mDBConnection;
static int version_val=1; // version of my table

//Constructor which sends db name to SQLiteOpenHelper
public MyDBHelper(Context context, String name, CursorFactory factory,
int version) {
super(context, name, factory, version);
this.myContext = context;
DB_PATH = "/data/data/"
+ context.getApplicationContext().getPackageName()
+ "/databases/";
}

// Used to get the Object

public static synchronized MyDBHelper getDBAdapterInstance(Context context) {
if (mDBConnection == null) {
mDBConnection = new MyDBHelper(context,DB_NAME,null,version_val);
}
return mDBConnection;
}

@Override
public void onCreate(SQLiteDatabase db) {
// TODO Auto-generated method stub

}

@Override
public void onUpgrade(SQLiteDatabase db, int oldVersion, int newVersion) {
// TODO Auto-generated method stub

}

public void createDataBase() throws IOException {
boolean dbExist = checkDataBase();
if (dbExist) {
// do nothing - database already exist
} else {

// By calling following method
// 1) an empty database will be created into the default system path of your application
// 2) than we overwrite that database with our database.
this.getReadableDatabase();
try {
copyDataBase();
} catch (IOException e) {
throw new Error("Error copying database");
}
}
}

private boolean checkDataBase() {
SQLiteDatabase checkDB = null;
try {
String myPath = DB_PATH + DB_NAME;
Log.d("MyPath",myPath);
checkDB = SQLiteDatabase.openDatabase(myPath, null,
SQLiteDatabase.OPEN_READONLY);

} catch (SQLiteException e) {
// database does't exist yet.
}
if (checkDB != null) {
checkDB.close();
}
return checkDB != null ? true : false;
}

private void copyDataBase() throws IOException {
// Open your local db as the input stream
InputStream myInput = myContext.getAssets().open(DB_NAME);
// Path to the just created empty db
String outFileName = DB_PATH + DB_NAME;
// Open the empty db as the output stream
OutputStream myOutput = new FileOutputStream(outFileName);
// transfer bytes from the inputfile to the outputfile
byte[] buffer = new byte[1024];
int length;
while ((length = myInput.read(buffer)) > 0) {
myOutput.write(buffer, 0, length);
}
// Close the streams
myOutput.flush();
myOutput.close();
myInput.close();
}

public void openDataBase() throws SQLException {
String myPath = DB_PATH + DB_NAME;
myDataBase = SQLiteDatabase.openDatabase(myPath, null, SQLiteDatabase.OPEN_READWRITE);
}

@Override
public synchronized void close() {
if (myDataBase != null)
myDataBase.close();
super.close();
}


public ArrayList<ArrayList<String>> selectRecordsFromDBList(String query, String[] selectionArgs) {
ArrayList<ArrayList<String>> retList = new ArrayList<ArrayList<String>>();
ArrayList<String> list = new ArrayList<String>();
Cursor cursor = myDataBase.rawQuery(query, selectionArgs);
if (cursor.moveToFirst()) {
do {
list = new ArrayList<String>();
for(int i=0; i<cursor.getColumnCount(); i++){
list.add( cursor.getString(i) );
}
retList.add(list);
} while (cursor.moveToNext());
}
if (cursor != null && !cursor.isClosed()) {
cursor.close();
}
return retList;
}


public long insertRecordsInDB(String tableName, String nullColumnHack,
ContentValues initialValues) {
return myDataBase.insert(tableName, nullColumnHack, initialValues);
}

public int deleteRecordInDB(String tableName, String whereClause,
String[] device_id) {
return myDataBase.delete(tableName, whereClause, device_id);
}
}

 Step 4: Creating a Class which helps me to Store my database values in a Variables

public class StoreValue {

String dev_id="";
String username="";
String password="";

public String getPassword() {
return password;
}
public void setPassword(String password) {
this.password = password;
}
public String getDev_id() {
return dev_id;
}
public void setDev_id(String dev_id) {
this.dev_id = dev_id;
}
public String getUsername() {
return username;
}
public void setUsername(String username) {
this.username = username;
}


}


Step5: Now i had created an Activity, which retervies the device id from my table, here what i had did, if the deviceid from the table matches with my the deviceid of current device which is given  by telephony manager,then i call Login Page instead of SignUp page.

Now cerating my Object for StoreVal class ,declare it and intiallize it

public class MyActivity extends Activity {

Intent Loginjump;
static String device_id;
String default_deviceid=null;
static int version_val=1;
private static final String DB_NAME = "frnd.db";
private ArrayList<StoreValue> mydata=null;
int i=0;
boolean mymatch=false;

/** Called when the activity is first created. */
@Override
public void onCreate(Bundle savedInstanceState) {
super.onCreate(savedInstanceState);
setContentView(R.layout.mysplashscreen);

MyDBHelper db = new MyDBHelper(getApplicationContext(),DB_NAME,null,version_val);

Log.d("Flow Starts ","0");

TelephonyManager telemngr = (TelephonyManager) getSystemService(TELEPHONY_SERVICE);
device_id=telemngr.getDeviceId();

mydata= getDeviceID(); // initialize the Object of StoreValue Class

Log.d("MyData Size",Integer.toString(mydata.size()));
for(i=0;i<mydata.size();i++)
{
System.out.println("Mydata of i"+(mydata.get(i).getDev_id()));
Log.d("My Device Id",device_id);
if(mydata.get(i).getDev_id().equals(device_id))
{
mymatch=true;
Log.d("MY Data ",mydata.get(i).toString());
Log.d("Device _ id",device_id);
break;
}


}

if(mymatch == true)
{
Loginjump= new Intent(MyActivity.this,LoginActivity.class);
startActivity(Loginjump);
}

else
{
Loginjump= new Intent(MyActivity.this,Sign.class);
startActivity(Loginjump);


}

}

public ArrayList<StoreValue> getDeviceID(){

MyDBHelper dbAdapter=MyDBHelper.getDBAdapterInstance(this);
try {
dbAdapter.createDataBase();
} catch (IOException e) {
Log.i("*** select ",e.getMessage());
}
dbAdapter.openDataBase();
String query="SELECT deviceid FROM login_details;";
ArrayList<ArrayList<String>> stringList = dbAdapter.selectRecordsFromDBList(query, null);
dbAdapter.close();

ArrayList<StoreValue> usersList = new ArrayList<StoreValue>();
for (int i = 0; i < stringList.size(); i++) {
ArrayList<String> list = stringList.get(i);
StoreValue user = new StoreValue();
try {
user.dev_id = list.get(0);
   
} catch (Exception e) {
Log.i("***" + MyActivity.class.toString(), e.getMessage());
}
usersList.add(user);
}
return usersList;
}

}

Step 6: If the Boolean Variable mymatch retruns false,means that's the device id of this device is not in database,at that time we have to call SignUp page and store the username and password and confpassword and deviceid in our login_details table. The Sample Code Sinnpet

public class Sign extends Activity {
EditText u_name=null,pwd=null,confpwd=null;
Button mysign_submit;
String username="",password="",confpassword="";
static Context c;
Intent Loginjump;

@Override
public void onCreate(Bundle savedInstanceState) {
super.onCreate(savedInstanceState);
setContentView(R.layout.fetch_mydetails);

u_name=(EditText)findViewById(R.id.userval);
pwd=(EditText)findViewById(R.id.mypwdval);
confpwd=(EditText)findViewById(R.id.myconfpwdval);
mysign_submit=(Button)findViewById(R.id.mysubmit);

c= this;

mysign_submit.setOnClickListener(new OnClickListener(){

@Override
public void onClick(View v) {
// TODO Auto-generated method stub
Log.d("I am fired","ok");
username=u_name.getText().toString();
password=pwd.getText().toString();
confpassword=confpwd.getText().toString();

//if(UserName)
Log.d("UserName",username);
Log.d("Password",password);
Log.d("ConfPassword",confpassword);

if(password != confpassword)
{
displayAlert();
}

MyDBHelper dbAdapter = MyDBHelper.getDBAdapterInstance(Sign.this);
dbAdapter.openDataBase();

ContentValues initialValues = new ContentValues();

initialValues.put("username", username);
initialValues.put("password",password);
initialValues.put("confpassword",confpassword);
initialValues.put("deviceid", MyActivity.device_id);

long n = dbAdapter.insertRecordsInDB("login_details", null, initialValues);
Toast.makeText(Sign.this, "new row inserted with id = "+n, Toast.LENGTH_SHORT).show();
if(n>0)
{
Loginjump= new Intent(Sign.this,MyProfile.class);
startActivity(Loginjump);
}
}
}); 
}
public static void displayAlert()
{
new AlertDialog.Builder(c).setMessage(" Your Password and Confrim Password are not Same ")
.setTitle("Password Alert")
.setCancelable(true)
.setNeutralButton(android.R.string.ok,
new DialogInterface.OnClickListener() {
public void onClick(DialogInterface dialog, int whichButton){
System.exit(0);
}
})
.show();
}
}

Step 7:  If the Boolean Variable mymatch retruns true,means that's the device id of this device is  in database,so we have to call Login page and reterives the username and password and check that username and password.

public class LoginActivity extends Activity{
EditText u_name=null,pwd=null;
Button mylogin_submit;
String username="",password="";
private ArrayList<StoreValue> mydata=null;
int i=0;
Intent Loginjump;
static Context c;

@Override
public void onCreate(Bundle savedInstanceState) {
super.onCreate(savedInstanceState);
setContentView(R.layout.logingui);
u_name=(EditText)findViewById(R.id.userval);
pwd=(EditText)findViewById(R.id.mypwdval);
mylogin_submit = (Button)findViewById(R.id.submit);
c= this;

mylogin_submit.setOnTouchListener(new OnTouchListener (){
@Override public boolean onTouch(View arg0, MotionEvent arg1) {
// TODO Auto-generated method stub
username=u_name.getText().toString();
Log.d("UserName",username);
password=pwd.getText().toString();
mydata=getValue();
Log.d("MyData Size",Integer.toString(mydata.size()));
for(i=0;i<mydata.size();i++)
{
System.out.println("Mydata of i"+(mydata.get(0).username));

if(mydata.get(i).getPassword().equals(password) && mydata.get(i).getUsername().equals(username))
{

Log.d("Success","Boss");
Loginjump= new Intent(LoginActivity.this,MyProfile.class);
startActivity(Loginjump);

}
else
{
Log.d("Failure","1");
displayAlert();
}
}
return false;
}});
}

public static void displayAlert()
{
new AlertDialog.Builder(c).setMessage(" Your Password and Confrim Password are not Same ")
.setTitle("Password Alert")
.setCancelable(true)
.setNeutralButton(android.R.string.ok,
new DialogInterface.OnClickListener() {
public void onClick(DialogInterface dialog, int whichButton){
System.exit(0);
}
})
.show();
}

public ArrayList<StoreValue> getValue(){

MyDBHelper dbAdapter=MyDBHelper.getDBAdapterInstance(this);
try {
dbAdapter.createDataBase();
} catch (IOException e) {
Log.i("*** select ",e.getMessage());
}
dbAdapter.openDataBase();
String query="SELECT * FROM login_details;";
ArrayList<ArrayList<String>> stringList = dbAdapter.selectRecordsFromDBList(query, null);
dbAdapter.close();

ArrayList<StoreValue> usersList = new ArrayList<StoreValue>();
for (int i = 0; i < stringList.size(); i++) {
ArrayList<String> list = stringList.get(i);
StoreValue user = new StoreValue();
try {
final StoreValue listItem = mydata.get(i); // --CloneChangeRequired
if (listItem != null) {

user.username = list.get(0);
//Log.d("list.get 0",list.get(0));
System.out.println("List get 0"+list.get(0));

user.password = list.get(1);
System.out.println("List get 1"+list.get(1));
System.out.println("List get 2"+list.get(2));
System.out.println("List get 3"+list.get(3));
// Log.d("list.get 1",list.get(1));
}
} catch (Exception e) {
//Log.i("***" + LoginActivity.class.toString(), e.getMessage());
}
usersList.add(user);
}
return usersList;
}
}


Notification in Android Using AlarmManager, BoradCastReceiver & Services

    Our aim is to show notification message to user in a specific time.     Say For example , I have planned to show Notification ...